Although in correspondence, we have referred to this section as the Masthead, its proper title is actually the SiteOrigin Hero section and will be referred to in this article as simply the Hero section.
Access the Hero Section
To access the Hero Section ensure you are logged in, then navigate to the homepage as the public would see it (easiest way is to click the ‘Vancouver Island Model Engineers’ test in the top left of your Dashboard).
While on the homepage, click the ‘Edit Page’.

Now you are on the editor side of the page but need to edit the correct section. Click ‘Edit’ on the SiteOrigin Hero section.

Once clicked you’ll see the first Hero Frame by default expanded. You can edit that section or collapse it by clicking on it’s title bar (ie. ‘Frame’). Select the frame you want to edit and then read on…

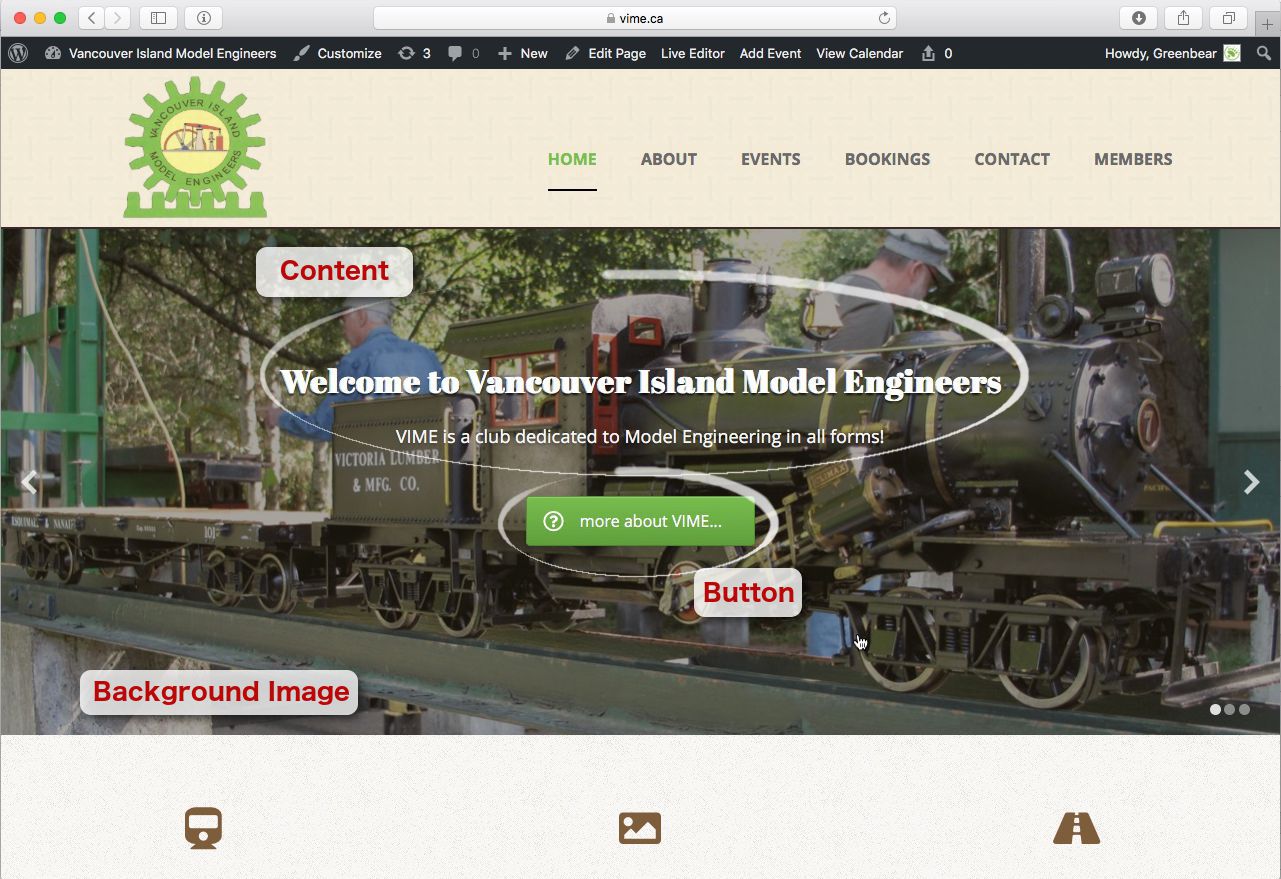
Purpose of the Hero section – The Hero exists on the homepage as the main section near the top underneath the navigation that highlights certain aspects that the organization wishes to bring to public attention. This section consists of a series of Hero Frames.
Each Hero Frame will contain a number of elements within them. Typically the Content, possibly a linking Button and a Background of sorts. The other overall aspects of the Hero section are also there (Slider Controls and Design and Layout) but are beyond the scope of this article.
The purpose of this article is to describe how to change/add and remove images and content from the Hero section.
The Hero Frame components are…
- Content – this is the main message of the Hero Frame
- Button – this is typically the ‘call to action’ button that links to the pertinent information that supports the content above it
- Background – typically, this consists of an image, but could be as simple as a colour.
Content
Your Content of your Hero Section is accessed by clicking on that ‘Frame‘ (in fact, all of the elements of the Hero Section are accessed that way).
Content is added in a normal fashion by simply typing and editing as you would with any standard editor. Tip: Be sure to centre your content otherwise it will end up left justified by default.
If you wish to add a ‘Button’ that would link through to somewhere you’ll need to add a ‘[button]’ shortcode. See the screenshot for this example.

Button
A Hero Section may have more than one button…but it is suggested to have just the one button that would link to the page or event etc… that you would like to use. Note; it is not necessary to have a button on the Hero Frame, it is used mainly for linking but can be left off.
To edit or add a button, click on the ‘Button’ to have that editor drop down.
The Button allows for Button Text (this is what appears on the actual button), a Destination URL (the page/event etc… you want to link to) and other options that you can experiment with but are beyond the scope of this article.
A note about the Destination URL you can use the ‘Select Content’ button to bring up all of the pages and events already on the site…or you can navigate to a page on the site and copy the URL from your browser and paste it in there as well. Be sure to check your button when done to make sure it goes to the URL you want it to.

Background
Changing the Background Image is similar to adding images to other items on the website. In this case, you’ll need to click on the ‘Background’ bar and ‘Choose Media’ . This will give you the option of uploading an image or selecting one from the Media Library.
Note; the nature of the Hero section is very panoramic so select an image that is much wider than it is tall.
The other settings for these background images should ideally match the ones set in the image below…but feel free to experiment as some images will require slight variations on the settings (ie. a brighter image may require less opacity).

Saving Your Work
Once you are happy with the settings of your Hero section, you will need to save it. It is very similar with the added exception of the new ‘Done’ button shown in the lower right of the editor. Click this to finish editing but don’t forget to also ‘Update’ as per usual.
Adding a New Hero Section
New Hero Sections can easily be added and removed according to the requirements of the site. For example, you may want to add a Hero Section to advertise a specific event for a short period of time, this would allow you to achieve this.
Simply click the ‘Add’ in the Hero Frames section to add a whole new Hero Section and follow the directives above to add in Content, Buttons and Background images.
You can also re-order the Hero Sections by clicking and dragging.
To remove a Hero Section, click the ‘x’ to the right of that frame.
Again, don’t forget to Update!
